
Transform your holiday table into a stunning focal point using natural elements and everyday items you already own. Pine cones, winter berries, and fresh evergreen branches create magical DIY holiday decorations when arranged in vintage mason jars or metallic containers. Layer different heights and textures—combining tall candlesticks with low-lying greenery—to create visual interest without blocking conversation across the table. Add warmth and sparkle by incorporating battery-operated fairy lights or metallic ornaments nestled among natural elements, creating an enchanting glow that transitions seamlessly from daylight to evening entertaining. Best of all, these centerpieces can be crafted in under an hour using materials that cost less than $30, proving that holiday magic doesn’t require a professional decorator’s budget or expertise.
Natural Elements That Sparkle
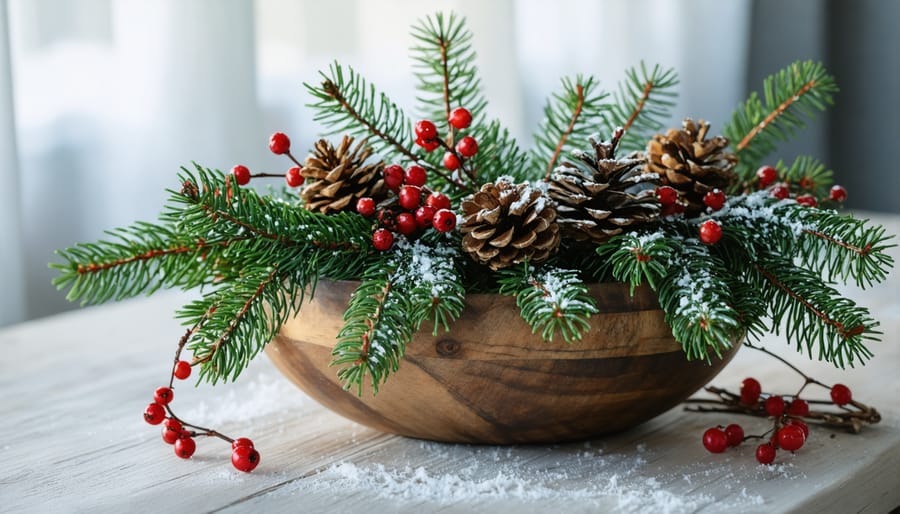
Pine and Berry Beauty
Nature provides some of the most stunning materials for creating memorable holiday centerpieces, and embracing these elements aligns perfectly with eco-friendly holiday celebrations. Start by gathering fresh pine branches, which not only look beautiful but fill your home with that iconic winter fragrance. I love mixing different varieties of evergreens – try combining traditional pine with cedar and spruce for varied textures and depths of green.
Layer your arrangement by placing the longest branches as your base, then nestle in clusters of pinecones collected from your backyard or local park. For a pop of color, incorporate winter berries like red holly or winterberry. If you can’t find fresh berries, craft stores offer realistic artificial options that can be reused year after year.
Add dimension by incorporating different heights – tall candlesticks surrounded by lower greenery creates visual interest. For extra sparkle, weave in battery-operated fairy lights or scatter small ornaments among the branches. A light dusting of artificial snow can add that magical winter touch, while metallic pinecones (easily DIY-ed with gold or silver spray paint) bring elegance to the natural elements.
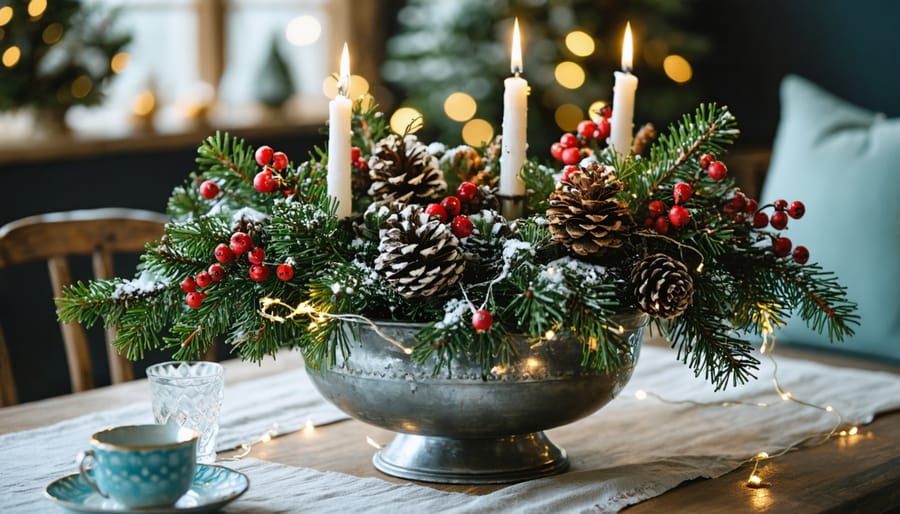
Candlelit Forest
Transform your holiday table into an enchanted forest with this magical centerpiece that brings the outdoors in. Start by gathering pinecones, small evergreen branches, and bare twigs from your backyard – I love how this activity becomes a mindful nature walk! Arrange these elements around three to five pillar candles of varying heights, creating depth and visual interest.
For a touch of sparkle, spray a few pinecones with gold or silver paint, or simply dust them lightly with artificial snow. Weave battery-operated fairy lights through the arrangement to add an ethereal glow that complements the candlelight beautifully. I’ve found that warm white lights create the most natural, cozy ambiance.
Layer in some moss or small bark pieces as a base to hide any containers or floral foam. For added charm, incorporate small woodland ornaments like ceramic mushrooms or tiny deer figures. A sprinkle of artificial cranberries adds festive pops of color without the mess of real berries.
Safety tip: Always keep natural elements at a safe distance from flame candles, or opt for flameless alternatives that provide the same warm glow without worry.
Repurposed Holiday Magic
Ornament Arrangements
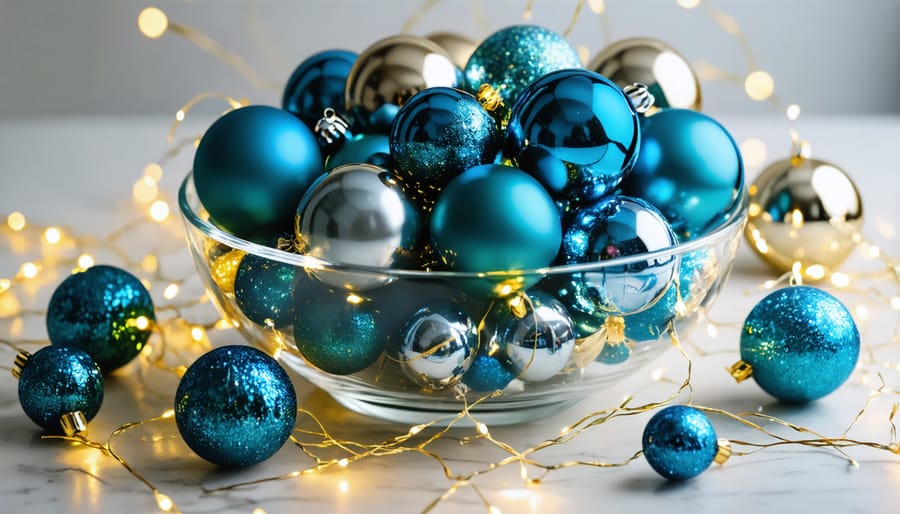
Transform those forgotten ornaments into stunning centerpieces that’ll have your guests asking, “Why didn’t I think of that?” I love using shiny baubles beyond the tree, and trust me, the possibilities are endless!
Create an elegant display by filling a clear glass hurricane vase with coordinating ornaments in metallic shades. Layer silver, gold, and rose gold balls for a sophisticated look, or stick to a single color for dramatic impact. Pro tip: Mix in different sizes for added visual interest.
For a modern twist, arrange ornaments in a shallow wooden bowl or metallic tray, interspersing them with battery-operated fairy lights for a magical glow. I’ve found that mixing matte and glossy finishes creates beautiful depth and texture.
Try floating oversized ornaments in water-filled clear bowls – just be sure they’re plastic! Add cranberries and floating candles for extra holiday charm. Or create a simple runner by lining up identical ornaments along a velvet ribbon down your table’s center.
Don’t forget about those vintage ornaments gathering dust in storage. Group them in antique teacups or arrange them in a vintage cake stand for a nostalgic touch that doubles as a conversation starter.
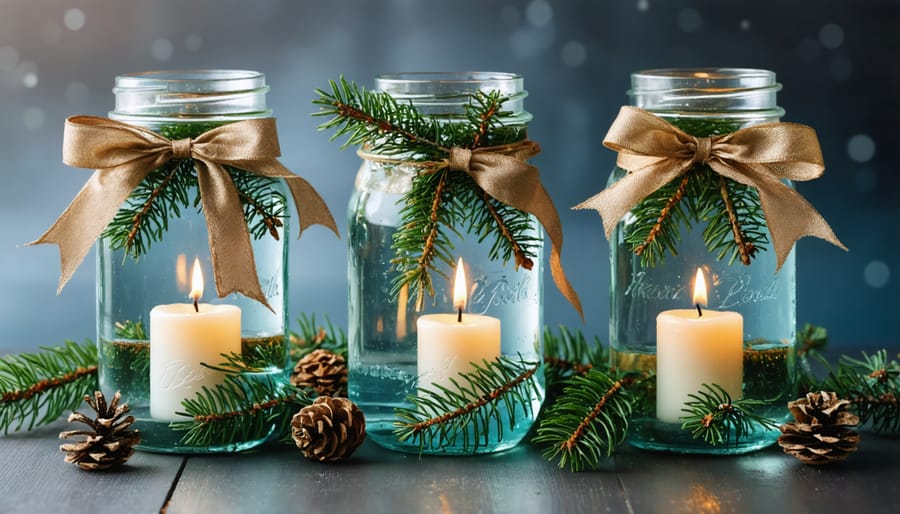
Mason Jar Wonderland
There’s something magical about transforming simple mason jars into stunning holiday centerpieces, especially when you’re decorating on a budget. I discovered this charming DIY trend during my first holiday hosting experience, and it’s become my go-to decoration strategy ever since.
Start by gathering various sizes of mason jars – those forgotten ones in your pantry are perfect! Fill them with battery-operated fairy lights for an enchanting glow, or layer them with artificial snow, miniature pine cones, and sparkly ornaments for a winter wonderland effect. One of my favorite arrangements involves tying festive ribbon around the jar’s neck and filling it with fresh cranberries and floating candles.
For a rustic touch, wrap twine or burlap around the jars and add sprigs of fresh evergreen. You can also create stunning effects by spraying the jars with frosted glass spray or adding glitter for extra sparkle. Group three to five jars of different heights together, perhaps placing them on a wooden slice or mirror base for added dimension.
Remember to keep your arrangement balanced but not too perfect – sometimes those slightly imperfect touches make the display feel more authentic and inviting.
Quick and Budget-Friendly Options
Five-Minute Flourishes
Need a quick centerpiece solution? These five-minute flourishes will save your holiday table! Fill a large glass bowl with a mix of metallic ornaments for instant glamour. For a natural touch, arrange pine cones and winter berries in a rustic wooden box – I found this works beautifully even with pieces gathered from my backyard.
Create a festive glow by floating cranberries and tea lights in water-filled mason jars. One of my favorite last-minute tricks is to wrap empty boxes in metallic paper and stack them pyramid-style, topped with a velvet bow. Or try this crowd-pleaser: arrange candy canes in a clear vase, tie a red ribbon around it, and nestle some fresh evergreen sprigs around the base.
For unexpected charm, fill wine glasses with artificial snow and top each with a mini ornament. Even simpler? Line up three pillar candles of varying heights on a metallic charger plate, surrounded by scattered evergreen sprigs and pinecones. These quick fixes bring instant holiday magic to any table setting!
Dollar Store Diamonds
Would you believe some of my most-complimented holiday centerpieces started with items from the dollar store? With a little creativity and the right techniques, budget-friendly materials can transform into stunning focal points for your holiday table.
Start by picking up glass vases, metallic spray paint, and artificial snow from your local dollar store. Spray paint the vases in silver or gold for an instant elegant upgrade. Fill them with a mix of dollar store ornaments in coordinating colors – think clusters of silver and white, or gold and cream for a sophisticated look.
Create depth by incorporating battery-operated string lights (yes, many dollar stores carry these now!) beneath the ornaments for a magical glow. Add sparkle with glitter-dusted pinecones, which you can DIY using dollar store pinecones and craft glitter.
For an extra touch of luxury, wrap the base of your vases with ribbon or artificial garland. Remember, the key to making dollar store items look expensive is to stick to a cohesive color scheme and layer different textures. When arranged thoughtfully, these affordable materials create centerpieces that look decidedly high-end without the designer price tag.
Care and Maintenance Tips
Keeping your holiday centerpieces looking fresh and festive throughout the season doesn’t have to be a daily struggle. I learned this the hard way after my first DIY centerpiece wilted before my guests arrived! Now, I’m excited to share some tried-and-true tips that have helped me maintain beautiful displays all season long.
For natural elements like evergreen branches and pine cones, lightly mist them with water every few days to prevent drying. If you’re using fresh flowers, change the water every two days and trim the stems at an angle weekly. A pinch of sugar in the water can help extend their life – a little trick my grandmother taught me!
Keep your centerpieces away from direct heat sources like vents, fireplaces, or sunny windows. The warmth can cause fresh materials to dry out quickly and may even affect some craft materials. For LED candles, check the batteries weekly to ensure consistent lighting throughout the season.
For fabric elements, like ribbons or burlap, a gentle shake outside every few days helps remove dust. Store any unused materials in a cool, dry place for next year. If you’re using dried elements like preserved leaves or berries, avoid touching them frequently as the oils from your hands can affect their appearance.
When it comes to glittered or painted items, use a soft makeup brush to gently dust them – it works wonders without damaging the decorative finish. For metallic elements, a quick wipe with a microfiber cloth keeps them sparkling.
Remember to refresh natural elements as needed throughout the season. Having backup materials ready makes this process quick and stress-free, ensuring your centerpiece remains a stunning focal point for all your holiday gatherings.
Creating your own holiday centerpieces is a journey of self-expression and creativity that doesn’t end with these suggestions. Remember, the most meaningful decorations often come from adding your personal touch and incorporating elements that reflect your unique style and family traditions. Don’t be afraid to mix and match ideas or experiment with different materials – that’s how new traditions are born!
I’ve seen countless readers transform these basic concepts into stunning masterpieces that perfectly suit their homes and personalities. Whether you prefer elegant and minimal or bold and festive, the key is to trust your instincts and have fun with the process. Start with one of these ideas as your foundation, then let your creativity guide you to make it truly your own.
Share your creations with friends and family, swap ideas, and don’t worry if your first attempt isn’t perfect. Each year brings new opportunities to refine your style and try fresh approaches. After all, the joy of DIY holiday decorating lies not just in the final result, but in the memorable moments spent creating something special for your loved ones to gather around.