

Transform your holiday gatherings with showstopping jello creations that create lasting memories and dazzle guests. These wiggly wonders have evolved far beyond the basic box mix, offering endless possibilities for festive entertaining. From sparkling champagne jellies that toast the New Year to layered peppermint treats that capture Christmas magic, holiday jello recipes combine whimsy with sophistication. Whether you’re continuing cherished family traditions or starting new ones, these versatile desserts adapt beautifully to any celebration – think Halloween’s spooky brain molds, Thanksgiving’s cranberry towers, or Easter’s pastel parfaits. Best of all, most recipes can be prepared days ahead, letting you focus on enjoying precious moments with loved ones. Get ready to discover how these beloved retro desserts are making a stylish comeback, reimagined with fresh flavors, elegant presentations, and Instagram-worthy appeal.
Classic Holiday Jello Recipes with a Modern Twist
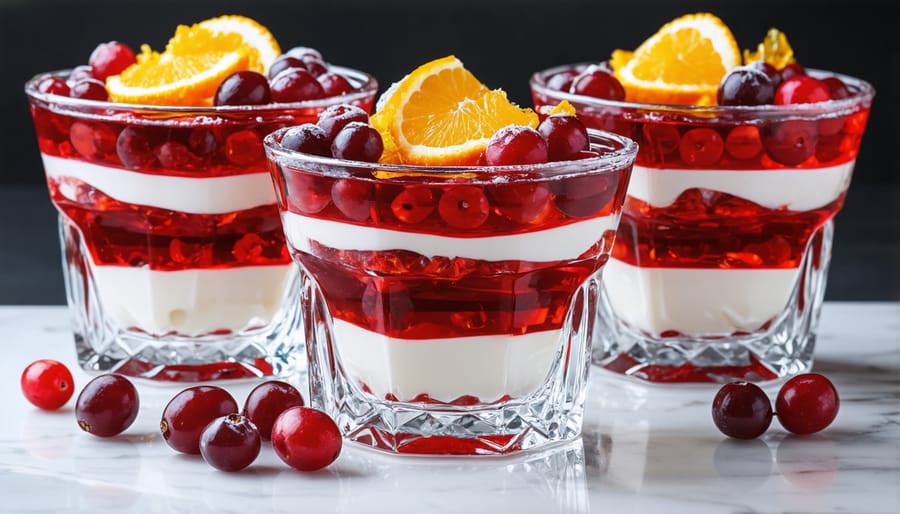
Cranberry-Orange Holiday Sparkler
When it comes to festive twists on classic dishes, this elegant Cranberry-Orange Holiday Sparkler is a showstopper that’ll have your guests reaching for seconds. I discovered this recipe during a holiday dinner party last year, and it’s been my go-to sophisticated jello creation ever since.
The secret lies in combining tart cranberry juice with bright orange zest and a hint of prosecco for that grown-up sparkle. The result? A crystal-clear, ruby-red dessert that catches the light beautifully on your holiday table. What I love most about this recipe is how it manages to be both nostalgic and modern at the same time.
To achieve that perfect wobble, use premium unflavored gelatin and fresh-squeezed orange juice – trust me, it makes all the difference! Layer the mixture with fresh cranberries and thin orange slices in a decorative mold for a stunning presentation. For an extra touch of glamour, I like to garnish with sugared cranberries and rosemary sprigs.
The best part? You can prepare this elegant dessert up to two days ahead, giving you more time to focus on other holiday preparations. It’s light enough to serve after a heavy Christmas dinner but special enough to be the centerpiece of your dessert table. Just remember to leave enough time for it to set properly – patience is key for that picture-perfect finish!
Champagne Celebration Cubes
Ring in the New Year with these sophisticated champagne-infused jello cubes that bring a touch of sparkle to your celebration! I discovered these elegant treats at a friend’s holiday soirée last year, and they’ve become my go-to party showstopper ever since.
These crystalline cubes combine the festive fizz of champagne with the playful elegance of jello, creating bite-sized pieces of celebration that’ll have your guests reaching for seconds. The best part? They’re surprisingly simple to make, yet look absolutely stunning on any holiday dessert table.
To create these glamorous bites, you’ll need your favorite champagne (prosecco works beautifully too!), unflavored gelatin, and a touch of sugar. For an extra special twist, I love adding a few drops of edible gold shimmer or a single gold leaf on top of each cube – it catches the light perfectly and adds that magical New Year’s Eve glamour.
Pro tip: Make these in a shallow pan for easy cutting, and use a warm knife between cuts for those picture-perfect edges. Remember to allow enough setting time – I usually make these the day before the party. Keep in mind that some of the alcohol does remain in these treats, so they’re strictly for the grown-ups at your gathering!
Store them in the refrigerator until ready to serve, and watch as they disappear faster than the countdown to midnight!
Show-Stopping Holiday Centerpieces
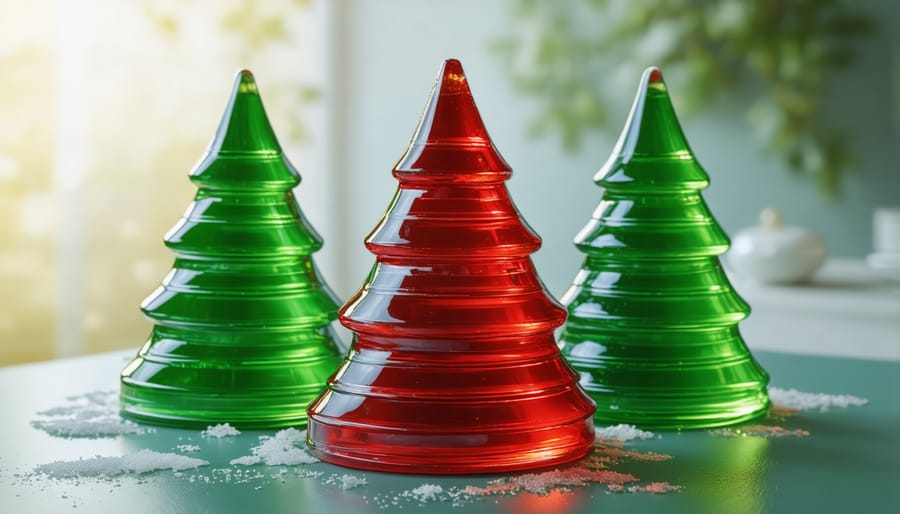
Stained Glass Christmas Tree Mold
Transform your holiday table into a whimsical wonderland with this show-stopping stained glass Christmas tree jello creation. Perfect among other festive holiday centerpieces, this layered dessert captures the magic of the season in every slice.
Using alternating layers of lime and cherry jello, we’ll create a stunning tree-shaped treat that looks like it belongs in a Christmas fairy tale. The secret to achieving that beautiful stained glass effect lies in the careful layering process and allowing each level to set just enough before adding the next.
Start with your tree-shaped mold (if you don’t have one, a regular bundt pan works beautifully too). Pour your first layer of lime jello and let it set until just firm to the touch – about 30 minutes in the refrigerator. Then, add your cherry layer, creating that gorgeous contrast that makes this dessert so special. Continue alternating until you reach the top of your mold.
Here’s my favorite trick: add a tiny drop of cream to each layer to create an enchanting frosted effect. Trust me, your guests will be amazed when you unmold this beauty! For extra sparkle, I like to garnish with a light dusting of edible glitter or coconut “snow.”
Remember, patience is key with this recipe. Each layer needs time to set properly, making this the perfect project for a cozy afternoon of holiday baking. The end result is worth every minute – a dazzling dessert that brings Christmas magic to life on your holiday table.
Winter Wonderland Snow Globe
Transform your holiday dessert table into a magical scene with this enchanting Winter Wonderland Snow Globe Jello! I stumbled upon this idea during a holiday party last year, and it’s become my go-to showstopper ever since.
Picture this: crystal-clear jello spheres that look just like snow globes, with suspended fresh fruit and edible decorations creating a mesmerizing 3D effect. The secret lies in using unflavored gelatin combined with light corn syrup for that perfect transparency. I love adding white peach slices, silver dragées, and tiny sprigs of mint to create a wintery scene inside each serving.
To achieve that magical suspended effect, you’ll need to work in layers. Start by pouring a thin layer of jello mixture into clear plastic cups or glass dessert bowls and letting it set partially. Then, carefully arrange your decorative elements and add more jello mixture. The key is timing – you want each layer to be just firm enough to hold your decorations but still tacky enough to bond with the next layer.
For extra sparkle, I like to dust the top with edible shimmer powder and garnish with a small rosemary sprig to mimic a miniature Christmas tree. The best part? You can customize the “scene” inside your snow globe to match your holiday theme. Try using red and green fruit for Christmas, or stick to white and silver elements for a winter wonderland effect.
Make these up to two days ahead, but keep them covered in the refrigerator to maintain their crystal-clear appearance. When serving, watch your guests’ faces light up as they discover these magical edible snow globes!
Kid-Friendly Holiday Jello Fun
Santa’s Helper Cups
These charming layered desserts are guaranteed to bring smiles to your holiday gathering! I started making these Santa’s Helper Cups last year, and they’ve quickly become a family favorite. The alternating red and white layers create a festive candy cane effect that’s absolutely perfect for Christmas parties.
To create these magical cups, you’ll need strawberry and cream-flavored gelatin, plus some whipped topping for extra richness. Start by preparing the red layer using strawberry gelatin and letting it set partially. Then, mix the cream-flavored gelatin with a dollop of whipped topping for a cloudy white appearance. Layer them alternately in clear plastic cups or fancy dessert glasses for that wow factor.
The trick to perfect layers is patience – each layer needs to set just enough to hold the next one without mixing. I like to prepare these a day ahead, giving them plenty of time to set completely. Top each cup with a swirl of whipped cream and a sprinkle of red sugar crystals for that extra festive touch.
These individual servings are perfect for holiday buffets or kids’ parties, and they’re so much fun to eat! The best part? You can adjust the number of layers based on your time and preference. Even two layers look stunning when done right.
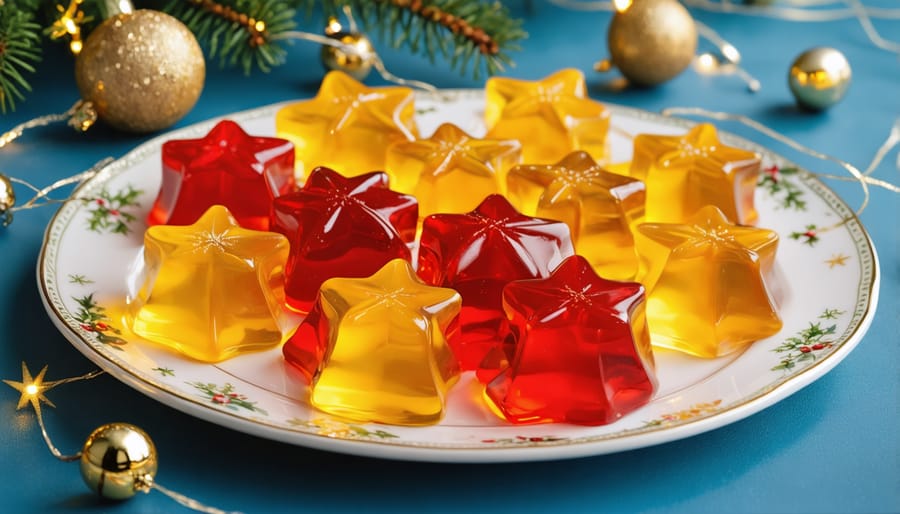
Holiday Jello Jigglers
Let me share one of my favorite holiday traditions – making festive Jello Jigglers with my kids! These fun, wiggly treats never fail to bring smiles to everyone’s faces at holiday parties, and they’re surprisingly simple to create.
To make these colorful cut-outs, start with two 3-oz boxes of Jello per 8×8 pan. Mix with just 1 cup of boiling water (less than usual) for firmer shapes that hold up well. Pour into a lightly greased pan and chill for about 3 hours or until completely firm.
The magic happens when you break out those holiday cookie cutters! Stars and trees work beautifully for Christmas, while hearts are perfect for Valentine’s Day. Pro tip: dip your cookie cutters in warm water between cuts for cleaner edges. For extra sparkle, sprinkle the shapes with colored sugar before serving.
Want to make them extra special? Try layering different colors – think red and green for Christmas or orange and black for Halloween. Just let each layer set for about 30 minutes before adding the next.
Store your jigglers in an airtight container, laying them flat with wax paper between layers. They’ll keep well in the fridge for up to a week, though in my house, they rarely last that long! These beloved treats are perfect for school parties, holiday gatherings, or any festive occasion where you want to add a touch of whimsy to the dessert table.
Tips for Jello Success
Let me share some tried-and-true tips that have saved many holiday jello creations over the years! As someone who’s had both spectacular successes and learning experiences with festive gelatin desserts, I’ve gathered these essential pointers to help you create picture-perfect results every time.
First, temperature matters immensely. Always use boiling water when dissolving your gelatin powder – this ensures complete dissolution and prevents grainy texture. For cold water additions, make sure it’s truly cold (but not icy) to achieve the right setting properties. I learned this the hard way during my first Christmas party when my layered jello didn’t set properly!
Timing is another crucial factor. Allow each layer to set for about 30-45 minutes until it’s firm but still slightly tacky before adding the next layer. This creates perfect bonds between layers and prevents separation. If the surface is completely firm, try scoring it gently with a fork to help the next layer adhere better.
For crystal-clear results, let the boiling mixture stand for a few minutes and skim off any foam that forms on top. When adding fruit, make sure it’s well-drained to prevent excess moisture from affecting the setting process. Pro tip: tossing canned fruit in the jello mixture as it starts to thicken will help prevent it from floating to the top.
Common troubleshooting issues? If your jello isn’t setting properly, check that you’re using the correct ratio of water to gelatin. Too much liquid is often the culprit. For faster setting, reduce the cold water slightly and use crushed ice instead – just remember to count the ice as part of your liquid measurement.
Unmolding can be tricky, but here’s a foolproof method: dip the mold in warm (not hot) water for about 10-15 seconds, run a knife around the edge, and place your serving plate on top. Flip quickly and confidently – hesitation often leads to partial unmolding! If you’re nervous, try spraying your mold lightly with cooking spray before starting.
Remember that patience is key – rushing the setting process usually leads to disappointment. I always make my holiday jello desserts a day ahead, which not only ensures proper setting but also reduces last-minute stress. Plus, they always seem to taste better after the flavors have had time to develop!
These delightful jello creations can be the perfect centerpiece at your holiday gatherings, especially when served on a decorative platter with fresh fruit garnishes or whipped cream. For best results, prepare your jello desserts 24 hours before serving and store them covered in the refrigerator. They’ll keep well for up to 5 days, though the texture is most enjoyable within the first 3 days. If you’re planning to transport your jello, use sturdy containers with tight-fitting lids and keep them chilled with ice packs. Remember to let the dessert sit at room temperature for about 5 minutes before serving to enhance the flavors. Whether you’re making a traditional layered dessert or trying one of our more creative options, these recipes are sure to bring smiles to your holiday table.