
Transform your home into a Valentine’s Day haven with heartfelt DIY decorations that speak volumes about love without breaking the bank. When decorating on a budget, everyday materials like paper, fabric, and cardboard become the building blocks of romance. Create stunning heart-shaped wreaths using coffee filters dipped in watercolor paint, craft elegant table centerpieces from mason jars filled with hand-cut paper flowers, or design a show-stopping wall display with origami hearts in ombré shades of pink and red.
The magic of homemade Valentine’s decorations lies in their personal touch – each piece tells a story and brings warmth to your space in ways store-bought items simply can’t match. Whether you’re planning an intimate dinner for two or decorating for a family celebration, these DIY projects offer endless opportunities to express creativity while creating lasting memories. From simple paper crafts perfect for crafting with children to sophisticated decor pieces that look professionally made, there’s a perfect project for every skill level and style preference.
Get ready to dive into a world where love meets creativity, and discover how ordinary materials can be transformed into extraordinary Valentine’s Day decorations that will make your home feel uniquely special this February 14th.
Romantic Paper Crafts That Pop
Heart-Stopping Paper Garlands
Transform your space with these enchanting paper garlands that add a romantic touch without breaking the bank. I’ve spent years perfecting the art of creating elegant garlands, and this heart-stopping version has become my go-to Valentine’s decoration.
Start by gathering your supplies: red, pink, and white cardstock, scissors, string or twine, and a pencil. For added sparkle, optional materials include glitter paper or metallic markers.
First, fold your cardstock in half and draw half-heart shapes along the fold. Make them in various sizes – I typically use 2-inch, 3-inch, and 4-inch heights for visual interest. Cut along your drawn lines while the paper is still folded to create perfect symmetrical hearts.
Thread your needle with string (or use tape if you prefer) and start stringing the hearts together. Here’s my favorite trick: alternate colors and sizes, leaving about 2 inches between each heart. To add dimension, slightly fold each heart down the middle before stringing.
For extra flair, write sweet messages on some hearts or add glitter accents. I love mixing in a few metallic hearts for unexpected shine. String your garland across windows, drape it over mantels, or create a stunning backdrop by hanging multiple strands at different heights.
Remember to store them flat between tissue paper – they’ll be perfect for next year’s celebrations!

3D Paper Heart Arrangements
Transform your space with stunning 3D paper heart arrangements that add depth and visual interest to any room. I love creating these because they look incredibly sophisticated despite being surprisingly simple to make. All you need is colored paper, scissors, and some string or clear fishing line.
Start by cutting several hearts in graduating sizes from your chosen paper. I typically use 6-8 hearts per arrangement, ranging from 2 to 6 inches in width. Fold each heart in half vertically, then unfold and create a gentle crease down the middle – this gives them that lovely dimensional effect when hung.
Here’s my favorite trick: layer your hearts back-to-back and slightly offset them before securing them with a small glue dot in the center. This creates a beautiful, spinning effect when hung. For added interest, try alternating different shades of pink and red, or mix in some metallic paper for extra sparkle.
Create multiple arrangements and hang them at varying heights from your ceiling or window frame. I’ve found that clustering odd numbers of these heart arrangements (like groups of 3 or 5) creates the most visually appealing display. For a modern twist, try an ombré effect using paper in graduating shades of the same color.
Remember to secure your hanging string firmly, and consider adding a tiny drop of clear nail polish to any knots to prevent slipping. These delicate decorations catch the light beautifully and create enchanting shadows that dance across your walls.
Fabric and Ribbon Magic
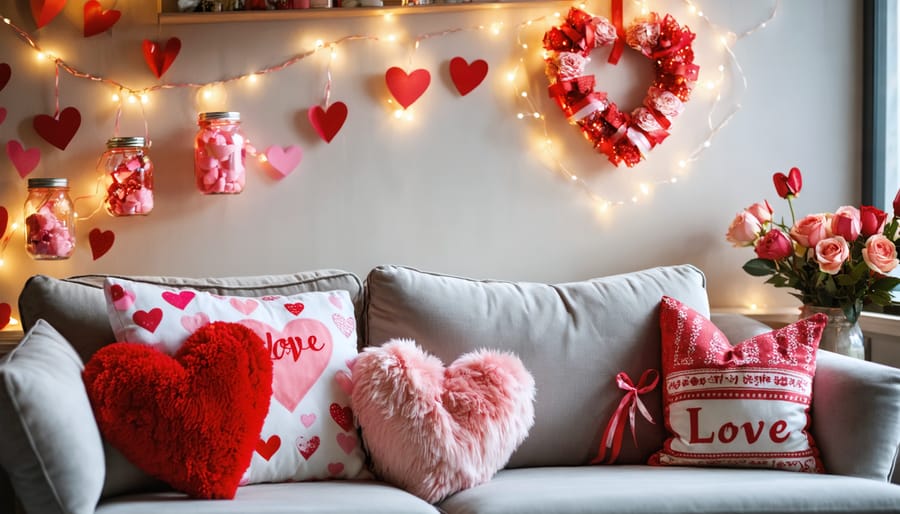
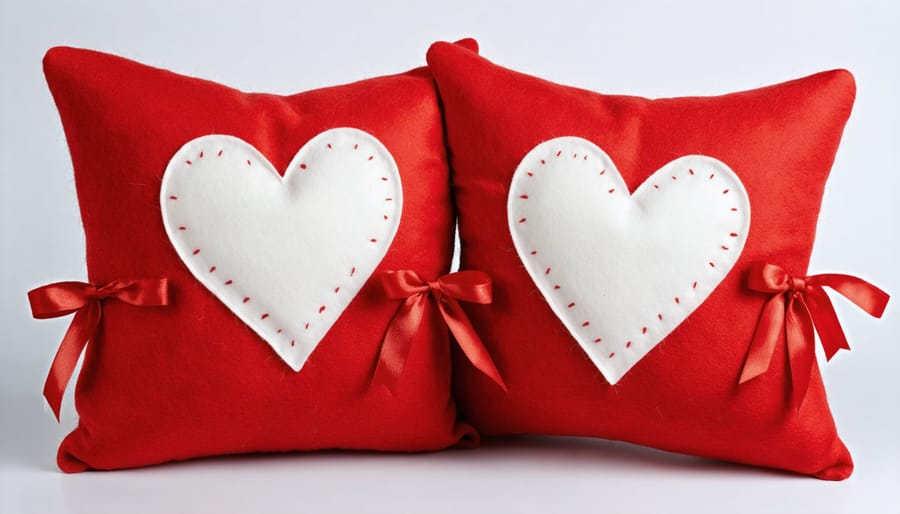
No-Sew Heart Pillows
Looking to add some cozy charm to your Valentine’s Day decor? These no-sew heart pillows are perfect for crafters who want to create beautiful DIY decorations without threading a single needle! I discovered this technique during a crafting afternoon with friends, and it’s been a game-changer for quick holiday updates.
Start with two pieces of fleece fabric cut into heart shapes (make them identical and about 18 inches wide). Layer them with right sides facing out, and cut 2-inch strips around the entire perimeter, keeping them about an inch apart. Tie corresponding strips from both layers together in simple knots, working your way around the heart. Leave a small section open to stuff your pillow with polyester fiberfill.
Once you’ve added enough stuffing to make it plump and cozy, continue tying the remaining strips. For extra flair, mix and match fabric patterns – think red and pink combinations, or add some whimsical prints for personality. The beauty of fleece is that it doesn’t fray, making it perfect for this no-sew technique.
Place these sweet pillows on your couch, bed, or window seat for instant Valentine’s charm. They’re not just decorative; they’re incredibly huggable too! Best of all, you can create several in an afternoon, making them perfect for last-minute holiday decorating or heartfelt handmade gifts.
Ribbon Wreaths and Swags
Transform your front door or living space into a romantic haven with a handmade ribbon wreath or swag this Valentine’s Day. I’ve found that these elegant decorations add just the right touch of whimsy and sophistication, and the best part is they’re surprisingly simple to create!
For a classic ribbon wreath, start with a wire wreath form (I recommend 14-18 inches for most doors). Choose a mix of ribbons in various shades of pink and red, along with some white or cream for balance. I love combining different textures – perhaps a luxurious velvet ribbon paired with sheer organza and traditional satin. Cut your ribbons into 6-8 inch lengths and start looping them around the wire form, creating full, lush clusters.
Want something a bit different? Try crafting a heart-shaped swag using a wire hanger bent into a heart shape. Layer your ribbons diagonally across the wire, securing them with floral wire at each intersection. Add some sparkle with metallic ribbon accents or small crystal beads – these catch the light beautifully!
For a modern twist, consider creating an asymmetrical design by concentrating your ribbons on one side of your wreath or swag. I’ve found this style particularly striking, especially when using an ombré effect with your ribbon colors. Don’t forget to add a few meaningful touches – perhaps some small photo frames or vintage Valentine’s cards tucked between the ribbons.
Remember, there’s no right or wrong way to arrange your ribbons – let your creativity guide you! These decorations typically last for years when stored properly, making them a wonderful Valentine’s tradition to bring out each February.
Upcycled Valentine’s Decor
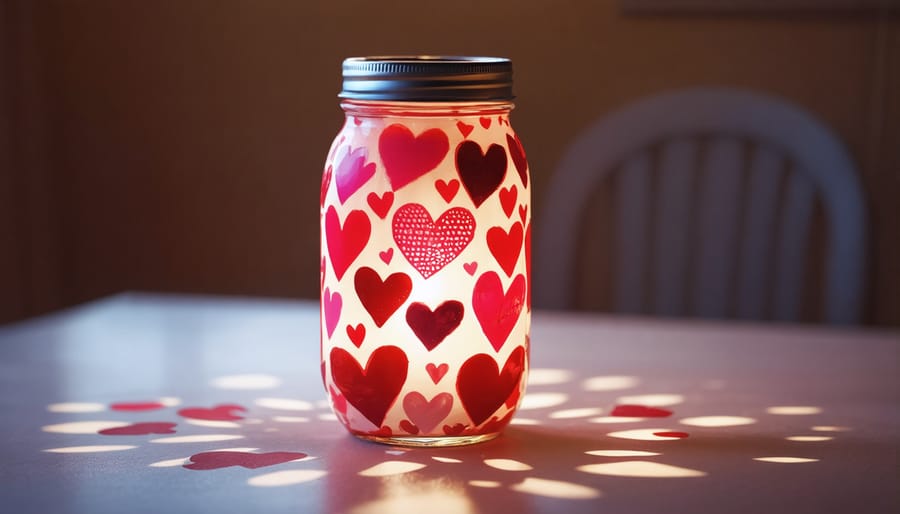
Mason Jar Love Lights
Transform ordinary mason jars into enchanting love lights that will add a magical glow to your Valentine’s Day decor. I absolutely adore how these simple containers become stunning centerpieces with just a few supplies and a touch of creativity.
Start by gathering your materials: clean mason jars, red and pink tissue paper, Mod Podge, heart stickers or cutouts, battery-operated tea lights, and a foam brush. You might already have most of these items tucked away in your craft drawer!
Begin by tearing your tissue paper into small, irregular pieces – don’t worry about being too precise here. Apply a thin layer of Mod Podge to the outside of your jar and carefully place the tissue paper pieces, overlapping them slightly. I find that mixing red and pink creates a beautiful stained-glass effect when illuminated. Continue until the entire jar is covered, then seal with another layer of Mod Podge.
Once dry, add heart stickers or cutouts to create silhouettes. For a more permanent option, you can use vinyl decals or paint your hearts directly onto the tissue paper layer. Place your battery-operated tea light inside, and watch as your creation comes to life with a warm, romantic glow.
Pro tip: Create a collection of jars in varying heights and colors to build a stunning Valentine’s display. I love grouping three or four together on a mirrored tray for added sparkle. These mason jar love lights make perfect gifts too – I’ve given them to friends who absolutely treasure them as unique Valentine’s keepsakes.
Remember to keep your tea lights easily accessible by not gluing the jar lids, making battery changes a breeze. These lovely luminaries will cast a perfect romantic ambiance for your Valentine’s celebration!
Wine Bottle Romance
Don’t let those empty wine bottles go to waste! Transform them into stunning Valentine’s centerpieces that’ll have your guests swooning. As someone who loves combining natural decorating elements with modern touches, I’ve found wine bottles to be the perfect canvas for romantic décor.
Start by removing labels completely (a warm water soak with dish soap works wonders). For a classic look, spray paint your bottles in Valentine’s colors – think matte white, rose gold, or soft pink. Create depth by using different shades on multiple bottles grouped together.
My favorite technique is the glitter-dipped effect: Apply adhesive to the bottom third of the bottle and roll it in fine glitter. The gradual fade from sparkle to clear glass creates magical candlelight reflections. For added romance, wrap thin copper wire lights around the bottles – these battery-operated strings are perfect for creating a warm, intimate glow.
Don’t forget the finishing touches! Long-stemmed roses, baby’s breath, or dried lavender make beautiful bottle fillers. For a more permanent display, insert LED branch lights or paint some twigs white for a modern winter wonderland effect.
Here’s a quick elegant idea: Tie red and pink ribbon in various widths around the bottle’s neck, letting them cascade down in different lengths. Add a vintage key or small heart charm for an extra touch of whimsy.
Remember, asymmetrical groupings of three or five bottles create the most visually appealing arrangements. Place them at different heights using books or boxes underneath your tablecloth for a professional-looking display.
Quick Valentine’s Vignettes
Mantel and Table Arrangements
Transform your mantel or dining table into a stunning Valentine’s Day focal point with these heartwarming arrangements. Just as we create beautiful holiday centerpieces, Valentine’s displays can make a dramatic impact with minimal effort.
For your mantel, create a layered look by starting with a base of red or pink fabric runner. Add height variation with different-sized mason jars filled with white fairy lights and wrapped in lace or twine. Between these, place paper heart garlands that cascade down the front of the mantel. I love adding vintage Valentine’s cards or family photos in rose-gold frames for a personal touch.
On your dining table, try clustering three cylindrical vases of varying heights. Fill them with water-colored pink using food coloring, then float white floating candles on top. Scatter rose petals and paper doilies around the base, and add small mercury glass votives for extra sparkle. For a sweet surprise, incorporate candy hearts or chocolate-filled mason jars into your arrangement.
One of my favorite budget-friendly tricks is creating a heart-shaped wreath using paper flowers made from old book pages or sheet music. Place it centered on your mantel or use it as a table centerpiece surrounded by tea lights. Remember, the key to an eye-catching arrangement is mixing textures and varying heights while maintaining a cohesive color scheme.
Window and Wall Displays
Transform your windows and walls into romantic Valentine’s Day focal points with these heartwarming display ideas. One of my favorite approaches is creating a cascading heart curtain using paper hearts in various sizes and shades of pink and red. Simply string them together with clear fishing line and hang them in front of your window – when sunlight streams through, it creates the most magical effect!
For your walls, try crafting a conversation heart gallery using colorful construction paper. Cut out large heart shapes, write sweet messages on them, and arrange them in a playful pattern. I’ve found that removable adhesive strips work perfectly for this and won’t damage your walls.
Window clings are another delightful option that kids especially love helping with. Mix equal parts white glue and dish soap, add food coloring, and use squeeze bottles to create designs directly on wax paper. Once dry, these peel off easily and stick to windows, catching light beautifully.
Don’t forget about your window sills! Arrange mason jars filled with red and pink tissue paper flowers, or create a lovely display using Valentine’s-themed paper lanterns. For a more sophisticated look, try making a modern geometric heart wall hanging using yarn and small wooden dowels.
Remember to consider your viewing angles – create displays that look stunning both from inside your home and to passersby outside. The best part? Most of these decorations can be made using simple craft supplies you probably already have at home.
As we wrap up our Valentine’s Day decoration journey, remember that the most meaningful decorations are those that reflect your personal style and the love you want to express. Don’t be afraid to experiment with different color combinations beyond traditional red and pink – maybe soft pastels or dramatic burgundy speak more to your aesthetic. The best part about crafting your own decorations is the freedom to customize every detail.
Take inspiration from the projects we’ve shared, but feel confident in adding your own creative twists. Whether it’s incorporating your partner’s favorite flowers into a wreath or using inside jokes in your banner messages, these personal touches make your decorations truly special.
If you’re new to crafting, start with simpler projects and gradually work your way up to more complex ones. Remember that perfection isn’t the goal – it’s the thought and effort that make homemade decorations so cherished. Keep your leftover materials organized for future projects, and don’t hesitate to involve family members or friends in your crafting sessions.
Most importantly, enjoy the creative process! Creating Valentine’s decorations can be a wonderful way to slow down and mindfully prepare for this celebration of love. Share your creations with our community – we’d love to see how you’ve personalized these ideas and made them your own. Happy crafting, and may your space be filled with heartfelt decorations that bring joy to everyone who sees them!